Timesheets
There are three options for timesheets: Worked Hours, Worked Hours Decimals, Weekly Summary.
Worked Hours timesheets are covered on this page. Worked Hours Decimals and Weekly Summary timesheets are covered on More Timesheets Info.
Depending on your company setup, it may be possible to enter some times on both Worked Hours and Worked Hours Decimal should the need arise. However, these timesheets cannot be used if a Weekly Summary timesheet has already been completed.
How to complete a Worked Hours timesheet
Things to remember when completing Worked Hours timesheets
How to apply specific jobs to a timesheet entry
Export Approved timesheets for Payroll Processing
How to complete a Worked Hours timesheet:
These are the standard instructions for completing a Worked Hours timesheet. There may be additional considerations for this function which will depend on how your organisation has them set up. These instructions refer specifically to the Worked Hours timesheet option, which is an hours/minutes based timesheet. See also More Timesheets Info for an explanation of the additional timesheet formats.
- Open the Timesheets menu
- Select Worked Hours
- By default the current week is displayed. If required, change the date – this displays the full week which contains that date.
Note that this won't necessarily show the date you selected, but may be the week-ending date as set up by Payroll in Admin | System Options | Timesheets. - To edit each day of the week in turn, click Edit in the Action column.
- Add your Start and Finish times. These must be in 00:00 time format (and 24-hour clock), e.g. 09:00, 17:30
- Add your Break amount. This must be in hours and minutes format, e.g. 01:00 (for one hour), or 00:30 (for 30 minutes)
- The timesheet may have Pay Item columns such as P01 or Ordinary Hours, P02 or Time and a half. Sometimes the Ordinary Hours columns may be automatically completed, and you need to manually complete any remainder. You must ensure that these columns indicate the correct hours and minutes for each.
If you have entered times on a timesheet where it has automatically calculated totals for you, and you make changes to data in start/finish/break, note that the calculated or automatically completed fields will NOT recalculate.
To make a change to timings, you must delete the original entry and then re-enter the details.
- Click Save.
The timesheet will be submitted to your Manager/Approver for approval.
Things to remember when completing Worked Hours timesheets:
- All times must be entered in HH:MM format.
For example: 08:30 for eight thirty a.m., or simply 9 for nine o’clock.
An error message will be displayed if the format is incorrect – this allows you to retry. - All times must also be in 24-hour format.
For example: 5pm must be entered as 17:00. If you enter this finish time as ‘5’ only, it will assume you mean 5 a.m. and the Total value will be a negative. - For Breaks amounts (generally, unpaid breaks), again use HH:MM format.
Working a standard 9 to 5 week (40 hours), this is listed as 07:36 hours (Normal or Ordinary time) per day. A half hour break would need to be entered as 0:24 each day. - You may also need to enter a breakdown of hours – this depends on how your company’s system is configured. Generally Ordinary hours are completed automatically, depending on your employment conditions. Then you would specify the number of overtime hours you have worked. For example: Your Start to Finish hours may include eight hours of normal and break time, one hour of time-and-a-half, and half an hour of double time. You would need to enter this into the relevant columns, again using HH:MM format.

- Note that the Left column contains an automatic system calculation to ensure that your days/hours are accounted for on the timesheet.
If you have any query with regards to the values displayed in this column, please refer to your company administrator for kiosk (such as Payroll or HR). - If you change the start or finish times, the Total will recalculate automatically, but Normal/Ordinary Hours will not.
Tab to the Normal/Ordinary Hours, delete the contents of the field then tab out of the field – this will populate the Normal/Ordinary Hours field with the recalculated amount. Repeat for other fields as required. (NB. If you change the Break time, simply tab out of the field and Normal time will recalculate automatically.) - The times you have entered in this record will be saved automatically when you click Edit on another day (note that the Status column displays Saved). Alternatively, if you are not entering any more times, click Save.

-
You may choose to complete your timesheet on a daily basis, or a whole week at a time. As soon as a record is saved, this will be available to your Manager for approval.
Deleting a Timesheet Entry.
If necessary, you can delete an entry. For example, you may have entered times for the wrong day:
- First click Edit for the relevant day – this record will now display a Delete button:

- Click Delete, then at the warning message asking if you are sure you want to delete the record, click OK. This will remove all times entered for that day
Note that once a record has been approved by your manager, you will not be able to edit or delete that record.
How do I apply specific Jobs to a Timesheet entry?
While completing a timesheet, daily entries may be attributed to specific Jobs. These entries can be for a Department, a Job code, or a Department and Job code combination.
Create the timesheet entry as usual, for example completing steps 1 to 4 for a Worked Hours timesheet. Alternatively, edit the required timesheet date if already created. Then follow these steps:
- Select the Jobs button:

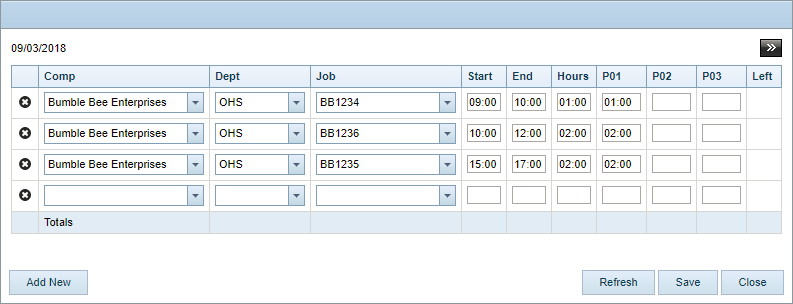
- A pop-up window is displayed. In the top left-hand corner, this shows the date that is being edited - check that this date is correct.
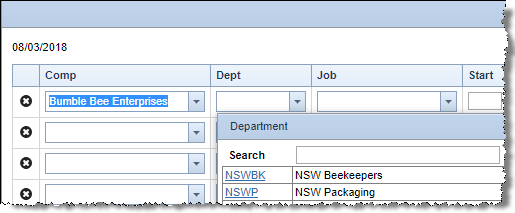
In this window you assign a Job to a time period during the selected date (this could be the whole day). - Use the drop-down fields to specify the appropriate Company/Department/Job to be associated.
- Select the appropriate Department and then Job code, Alternatively select a Department or a Job code.
Note that Departments are not listed until a Company has been selected.
- After selecting the relevant Comp/Dept/Job, enter the Start and End times to indicate hours worked on that particular job.
Note that this might include different pay items, as in this example (P01, P02, P03). The options here should be clarified with your company administrator for kiosk (or your manager).
Note that multiple Job entries can be specified in this window, because different time specifications can be applied to each job. For example, if several projects are worked on during a day, it might require entries of different time slots per job code.
- Once the Job entries are complete, click the Save button. This will close the pop-up window, and the total Job hours will appear on the timesheet. The remaining worked time for this day will be automatically allocated to the usual position of employment.
- Save the timesheet entry.
Multiple Job entries can be specified in this window, because different time specifications can be applied to each job. For example, if several projects are worked on during a day, it might require entries of different time slots per job code:

If you require additional lines for entering times, click the Add New button.
Once you have saved these entries, the total hours will appear in the Jobs column on the timesheet.
Note: you may notice the Expand button:  to the right of the pop-up window. This can display two additional columns; Cost and Invoice, however this area is not an active function currently.
Check completed timesheets:
- Open the Timesheets menu
- Select Worked Hours
- Find the relevant date - when selected, the date will revert to the associated week-ending date.
The completed timesheet will be displayed automatically
With the appropriate permission level, timesheets can also be viewed in Reports:
- Open the Reports menu
- Specify the date range in From and To
- Click Search
This will display a list of all your timesheet submissions for the date range. Click Report to export the information to a PDF file.
Escalated Timesheets
If timesheets have been escalated to you for approval, these will be displayed in this window. The timesheet approval process here is the same as it is in My Team | Team Timesheets. If you wish to escalate any of the timesheets to another approver, you need to repeat the process described in Escalating Requests.
Export Approved Timesheets for Payroll Processing
This process is particularly for users with HR3 payroll Lite. It can be carried out by those with HR3 payroll if preferred, however HR3 payroll does allow you to import directly to payroll.
Continue with the following steps to export approved timesheets for payroll processing. Typically, this process is completed by the Administrator or by Payroll.
- Open the Timesheets menu
- Select Payroll Export
- The default company is displayed, along with All My Team in Employee. Change this if required.
- Change the Start and Finish Date – the date range that contains the timesheets for processing.
- Click Refresh to display all the associated timesheets within the date range.
- Check that the timesheets displayed are the correct ones for exporting, then click Export to HR3:

- Use the filter options to exclude or include entries, as appropriate. (See Admin Menu - Requests for information on filter options.)
- When the list of entries is correct, click

Do not export any timesheets unless they have been checked and you are certain that they are correct. Once exported, the timesheets are assigned the status of 'Locked' and no further changes can be made to that timesheet in kiosk.
Return to Common Tasks
